How to Write a Stunning Readme for Your Projects

Rashedul Alam
November 26, 2021

Photo by @synkevych on Unsplash
Readme is a detailed overview of your project, discussing what your project is, how to install it or configure it, how to use it, who the authors are, and all the other related stuff.
It is the first impression of your project. Whenever someone clicks on your repository, he will first check the readme to get an idea of what the project is all about. Detailed readmes always create a good impression of the project.
Now, in this article, we will see how to create an awesome and detailed readme in all your projects. So, without a further-a-do, let’s get right into it:
Why do you need to write a readme?
Readmes help people understand what your project is about.
Readme is a must if you are developing an open-source project. Even if you are not doing open source, you should write a readme so that other co-workers of this project can understand the project well.
Also, writing great readmes can help you land a better job. So, it is always useful to write a better readme for each of your projects.
TL;DR
Readmes are usually written in Markdown languages. So, a basic knowledge of markdown is needed to write the readme.
In this article, we will also learn about some basic Markdown syntaxes that will be needed to write a better readme or any markdown documents:
-
First of all, markdown languages also support markup languages. So, if you have a little bit of knowledge about HTML, you can use the HTML syntaxes too.
-
You can write the heading using the # notation. The number of hashtags represents the level of the header. You can use up to 6 header levels. For example,
# This is Heading level 1
## This is Heading level 2
### This is Heading level 3
- Adding an extra line break in the paragraph separates the paragraph. For example,
This is the first paragraph.

This is the second paragraph.
-
You can bold a text by wrapping them using
**. For example,**some text**will result in some text. -
For italicizing texts, use only one
*to wrap the texts. For example,*some text*will result in some text. -
The following example demonstrates how to add an ordered list:
1. This is ordered list element 1
2. This is ordered list element 2
3. This is ordered list element 3
You also can create an unordered list like below:
- This is unordered list element 1
- This is unordered list element 2
- This is unordered list element 3
- You can add images in the readme by using the following code:

- You can add links using the following code:
[Link Text](https://path/to/link)
- You can show the code samples in the readme using the following notation:
`This is an inline code`

```
This is a code block
```
That’s pretty much all you need to know to write the readmes, or contributions, or any other markdown documents for your project.
Now, as we know some basic markdown syntaxes, let’s deep dive into how we can create a beautiful readme for your projects.
Step-by-step process on how to write a better readme
The good thing is, we do not need to create a readme file from scratch. There are so many readmes out there in GitHub, that will help you create your readme easily.
Awesome readme is a great resource for finding the best readme designs specific to the projects.
I generally use the Best-Readme-Template in almost all my projects, because it has many functionalities that are useful in demonstrating the projects. So, in this article, let’s create a readme using this template.
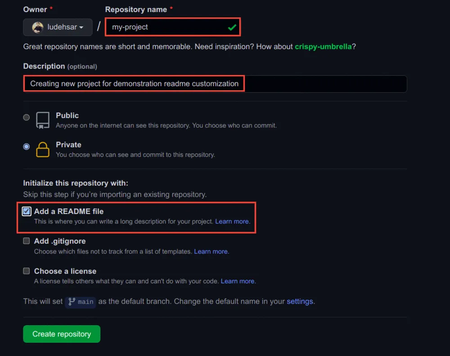
Step 1: Creating a GitHub repository
Let’s first create a GitHub repository by clicking on the plus button in the top right corner. Give the project title, description, and check on the “Add a README file”. After that, click on the “Create Repository” button.
Step 2: Copying the Readme content in your repository’s readme
Now, go to the Best-Readme-Template repository, and click on the README.md file. Then click on the “Raw” button.

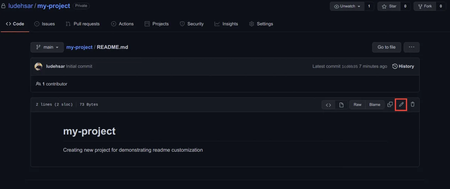
After clicking on the raw button, copy all the texts displayed in the browser. Then paste them into your projects’ readme file.
To paste in your readme, click on the “Edit” icon button in your README.md file:
Step 3: Changing the README file according to the project details
Now, it’s time to change the README.md file according to the project description. Let’s start by changing the project title and overview of the project.
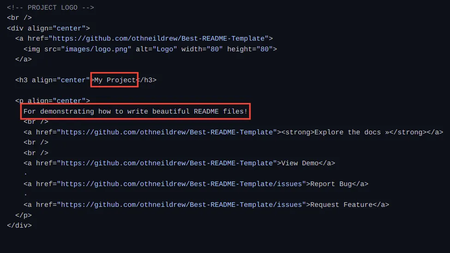
Like this, you should change the remaining sections according to your project. You can add or remove some sections according to your project.
You should also focus on the links and images, and change them accordingly.
To preview the changes, just click on the preview button.

Another thing to notice is that you can add customized shields that will represent the states of your repositories or link to your LinkedIn profile.
In your readme templates, you can find some shields like below:

Now, if you scroll at the bottom, you can customize those shields according to your project:
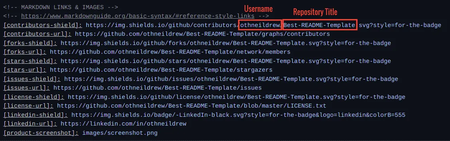
As stated in the above picture, change your GitHub username and repository URL accordingly to all the links. Then you will see the magic in the preview.
If you want to use other shields in your projects or just want to explore them, feel free to visit them at https://shields.io.
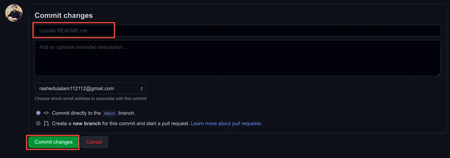
Step 4: Saving and committing those changes
After you make changes to your readme file, scroll down to the “Commit changes” section, write a commit message and click on the “Commit changes” button.
Woo-Hoo! You now have created a stunning-looking Readme in your GitHub repository.
Final Thoughts
In this article, we have seen how we can create a beautiful, detailed, and organized readme in our repositories.
Well-organized readmes create the best impression about the developer. It proves that the project is organized, documented, and well maintained.
Anyway, thanks for reading my article. Have a nice day!