Easily Integrate ClamAV Antivirus Software in Your Node.js Application

Photo by @alinnnaaaa on Unsplash
Security is an important keyword when it comes to the internet and web applications. We always try hard to keep our system safe and secure from cyber-attacks. Compromising security can cause us to expose our valuable information and thus can ruin our business.
Most of the security attacks are done by uploading malicious files to the website. Many websites allow users to upload files such as profile photos, resumes, and so on. Hackers may use this opportunity to upload vulnerable files to the website and gain unauthorized access.
So, if our web application allows users to upload files, then we need to provide some level of security to scan the vulnerabilities in the files. We should install antivirus software on our server and scan the uploaded files.
ClamAV is a great option for scanning files in web applications. Because of its versatility, it supports multiple file formats and signature languages. There is also a great Node.js package called clamscan, which provides an API for scanning files from the backend application.
In this article, we will explore how we can use clamscan to scan files for detecting viruses and malicious content in the server. So, without a further-a-do, let’s get right into it.
Installing and Configuring ClamAV in Ubuntu
At first, we need to install ClamAV on our server or local computer. Installing ClamAV on a Linux machine is pretty easy:
- For installing on Fedora-based distros,
sudo yum install clamav
- For installing on Debian-based distros,
sudo apt-get install clamav clamav-daemon
- For OS X,
sudo brew install clamav
After installing ClamAV on our Linux machine, we need to configure some settings. For computers running Ubuntu as their operating system, execute the following command in the terminal to start the clamav-freshclam.
sudo service clamav-freshclam restart
sudo service clamav-freshclam status
After that, we should start the clamav-daemon service. This process is very important because it will create a socket file in /var/run/clamav/clamd.ctl which will be used to scan the file stream uploaded to the server.
Let’s run the following command in the terminal to start the clamav-daemon:
sudo service clamav-daemon start
sudo service clamav-daemon status
After installing and configuring ClamAV in our Linux machine, we are ready to proceed further to implement scanning files in our Node.js application.
Setting Up the Project
At first, let’s create a new project and set up some basic configurations.
To create a new Node.js application from scratch, we need to type the following command in the terminal:
npm init -y
It will create a package.json file with some information. Then we should install the required packages along with the express js by running the following command in the terminal:
npm install express
This command will install express js and all other dependencies required for running the Node.js application. Next, let’s create a file called server.js in the root directory of the project. Here, we will paste the following code blocks.
const express = require('express')
const app = express()
const port = 3000

app.listen(port, () => {
  console.log(`Server is listening on port ${port}`)
})
To run the server, let’s add the following code in the package.json.
{
	// ...
	"scripts": {
		"start": "node server.js",
		// ...
	},
	// ...
}
Now, if we run npm start in the terminal, we should see a message “Server is listening on port 3000”. That means our application has been successfully configured.
Installing and Configuring Clamscan
Now, as we have initialized our project, and implemented some basic configurations, it’s time for us to install and configure clamscan to the project.
To install clamscan, we should write the following command in the terminal:
npm install clamscan
It will install all the necessary dependencies and APIs required for using ClamAV for scanning and discovering malicious files.
Now, we need to change our code in the server.js like below to configure clamscan.
const express = require('express')
const app = express()
const port = 3000

const clamscanConfig = {
  removeInfected: true, // If true, removes infected files
  quarantineInfected: false, // False: Don't quarantine, Path: Moves files to this place.
  scanLog: null, // Path to a writeable log file to write scan results into
  debugMode: true, // Whether or not to log info/debug/error msgs to the console
  fileList: null, // path to file containing list of files to scan (for scanFiles method)
  scanRecursively: true, // If true, deep scan folders recursively
  clamscan: {
    path: '/usr/bin/clamscan', // Path to clamscan binary on your server
    db: null, // Path to a custom virus definition database
    scanArchives: true, // If true, scan archives (ex. zip, rar, tar, dmg, iso, etc...)
    active: true // If true, this module will consider using the clamscan binary
  },
  clamdscan: {
    socket: '/var/run/clamav/clamd.ctl', // Socket file for connecting via TCP
    host: '127.0.0.1', // IP of host to connect to TCP interface
    port: 3310, // Port of host to use when connecting via TCP interface
    timeout: 120000, // Timeout for scanning files
    localFallback: false, // Do no fail over to binary-method of scanning
    path: '/usr/bin/clamdscan', // Path to the clamdscan binary on your server
    configFile: null, // Specify config file if it's in an unusual place
    multiscan: true, // Scan using all available cores! Yay!
    reloadDb: false, // If true, will re-load the DB on every call (slow)
    active: true, // If true, this module will consider using the clamdscan binary
    bypassRest: false, // Check to see if socket is available when applicable
  },
  preference: 'clamdscan' // If clamdscan is found and active, it will be used by default
}

const NodeClam = require('clamscan')
const ClamScan = new NodeClam().init(clamscanConfig)

app.listen(port, () => {
  console.log(`Server is listening on port ${port}`)
})
Scanning Files
Now, we can scan the files in our server by using the following code block:
// ...

// Get instance by resolving ClamScan promise object
ClamScan.then(async clamscan => {
  try {
      const {isInfected, file, viruses} = await clamscan.isInfected('/some/file.zip')
      if (isInfected) console.log(`${file} is infected with ${viruses}!`)
      else console.log('File is harmless')
  } catch (err) {
      console.log('Error:', err.message)
  }
}).catch(err => {
  // Handle errors that may have occurred during initialization
  console.log('Initialization Error:', err.message)
})

// ...
We can also modify our code to scan the files uploaded through the API. Thus we can easily detect malicious content before even saving the files to the storage.
But before going into that, we need to install a couple more packages: cors and express-fileupload. We need these packages to implement uploading files to the server. We can install these two packages by running the following command in the terminal:
npm install cors express-fileupload
Now, let’s create a new file called config.js and move the clamscanConfig to the config.js. Let’s also add fileUploadConfig in the config.js, which will be the configuration options for express-fileupload.
const clamscanConfig = {
  removeInfected: true, // If true, removes infected files
  quarantineInfected: false, // False: Don't quarantine, Path: Moves files to this place.
  scanLog: null, // Path to a writeable log file to write scan results into
  debugMode: true, // Whether or not to log info/debug/error msgs to the console
  fileList: null, // path to file containing list of files to scan (for scanFiles method)
  scanRecursively: true, // If true, deep scan folders recursively
  clamscan: {
    path: '/usr/bin/clamscan', // Path to clamscan binary on your server
    db: null, // Path to a custom virus definition database
    scanArchives: true, // If true, scan archives (ex. zip, rar, tar, dmg, iso, etc...)
    active: true // If true, this module will consider using the clamscan binary
  },
  clamdscan: {
    socket: '/var/run/clamav/clamd.ctl', // Socket file for connecting via TCP
    host: '127.0.0.1', // IP of host to connect to TCP interface
    port: 3310, // Port of host to use when connecting via TCP interface
    timeout: 120000, // Timeout for scanning files
    localFallback: false, // Do no fail over to binary-method of scanning
    path: '/usr/bin/clamdscan', // Path to the clamdscan binary on your server
    configFile: null, // Specify config file if it's in an unusual place
    multiscan: true, // Scan using all available cores! Yay!
    reloadDb: false, // If true, will re-load the DB on every call (slow)
    active: true, // If true, this module will consider using the clamdscan binary
    bypassRest: false, // Check to see if socket is available when applicable
  },
  preference: 'clamdscan' // If clamdscan is found and active, it will be used by default
}

const fileUploadConfig = {
  useTempFiles: false,
  limits: {
    fileSize: 26214400,
  },
  limitHandler: (req, res) => {
    res.writeHead(413, {
      Connection: 'close',
      'Content-Type': 'application/json',
    })
    res.end(
      JSON.stringify({
        success: false,
        data: {
          error: `File size limit exceeded. Max size of uploaded file is: ${
            26214400 / 1024
          } KB`,
        },
      })
    )
  },
}

module.exports = {
  clamscanConfig,
  fileUploadConfig
}
Now, let’s add the following code blocks to the server.js file:
// ...
const cors = require('cors')
const fileUpload = require('express-fileupload')
// ...

const config = require('./config')

// ...

// CORS Middleware
app.use(cors())

// Middleware for attaching clamscan with the express request
app.use(async (req, _, next) => {
  req.clamscan = await new NodeClam().init({ ...config.clamscanConfig })
  next()
})

// Middleware for attaching files to req.files
app.use(fileUpload({ ...config.fileUploadConfig }))

// ...
Here, we will use req.clamscan in each router, where we need to upload a file or multiple files.
After changing the server.js this far, the complete server.js will be something like the code below:
const express = require('express')
const cors = require('cors')
const fileUpload = require('express-fileupload')
const NodeClam = require('clamscan')

const config = require('./config')

const app = express()
const port = 3000

// CORS Middleware
app.use(cors())

// Middleware for attaching clamscan with the express request
app.use(async (req, _, next) => {
  req.clamscan = await new NodeClam().init({ ...config.clamscanConfig })
  next()
})

// Middleware for attaching files to req.files
app.use(fileUpload({ ...config.fileUploadConfig }))

app.listen(port, () => {
  console.log(`Server is listening on port ${port}`)
})
Implementing the Upload API
So far, we have configured so many things! Now, it’s time to create an upload route, where the files will be uploaded.
Let’s first create a simple POST API for uploading files:
// ...

// POST: /avatar-upload route
app.post('/avatar-upload', (req, res) => {
  if (!req.files || !req.files.avatar) {
    res.status(409).json({
      message: 'No file uploaded!'
    })
  }
  const avatar = req.files.avatar
  avatar.mv('./uploads/' + avatar.name)
  res.status(200).json({
    message: 'File successfully uploaded!'
  })
})

// ...
Here, we have implemented a simple POST API for uploading avatar images. We can test this API by uploading a file using Postman or any other platform. Before that, we need to create a folder called upload in the root directory of the project to prevent the error of not finding the directory.
If the files are successfully uploaded, let’s go to the next phase where we will scan the files before storing them.
Let’s change the above code to scan the files before saving them on the server:
// ...
const Readable = require('stream').Readable

// ...

const scanFile = async (file, clamscan) => {
  const fileStream = Readable()
  fileStream.push(file.data)
  fileStream.push(null)

  const result = await clamscan.scanStream(fileStream)

  return {
    filename: file.name,
    is_infected: result.isInfected,
    viruses: result.viruses,
  }
}

// POST: /avatar-upload route
app.post('/avatar-upload', async (req, res) => {
  if (!req.files || !req.files.avatar) {
    return res.status(409).json({
      message: 'No file uploaded!'
    })
  }

  const avatar = req.files.avatar

  const scanResult = await scanFile(avatar, req.clamscan)

  console.log(scanResult)

  if (!scanResult.is_infected) {
    avatar.mv('./uploads/' + avatar.name)
    return res.status(200).json({
      message: 'File successfully uploaded!'
    })
  }

  return res.status(502).json({
    message: 'Malicious file found!'
  })
})

// ...
Result
Now it’s time to test the API. Let’s upload a malicious file and see what the output from the server is.
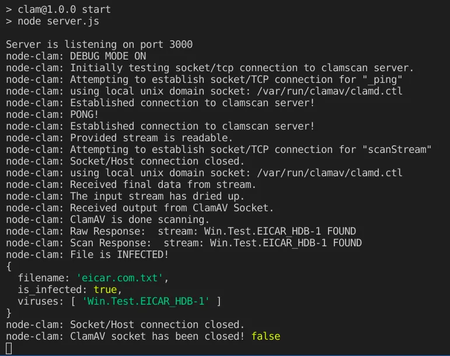
We can see that the antivirus software has successfully detected the malicious file, and it stopped the web application from storing the file on the server. We can also warn the users by notifying them about the virus.
Summary
So far, we have installed ClamAV on our Linux Machine and created a Node.js application where we can scan the uploaded file and detect if the file is infected or not. We have also tested our API by uploading a malicious file.
We can now use this knowledge and implement scanning malicious files in all our backend applications. It will give our users better reliability and confidence in using our application.
Also, we can prevent our websites from harmful attacks and security breaches. Although we cannot be 100% safe from the attackers, it will keep us somewhat ahead of them and keep our resources safe and secure.