Beautify Your GitHub Profile Like a Pro

Rashedul Alam
May 11, 2022

Photo by @rubaitulazad on Unsplash
Making a great GitHub portfolio is very helpful for any developer. It helps create a great impression, and it is one of the best ways to make your skills stand out.
This tutorial will make your boring GitHub profile into a super professional-looking portfolio. So without further ado, let’s get right into it.
Step 1: Create a New Public Repository
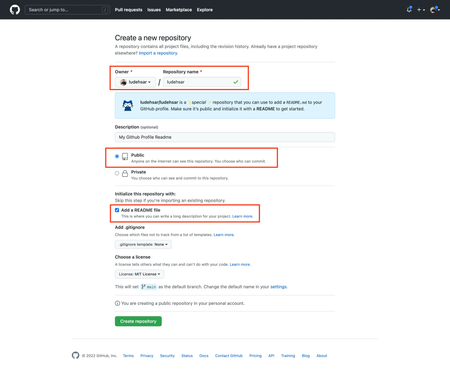
The first step is to create a new public Repository with the same name as your GitHub username. In my case, my GitHub username is ludehsar, so I am starting a new public repository named ludehsar.

Ensure the project is Public and “Add a README file” is checked.
After that, click on the “Create repository” button.
Step 2: Edit the README.md file
Now, after creating a new repository, click on the edit icon in your README.md file, and paste the following code:
### Hi there 👋
I am Md Rashedul Alam Anik, currently working as a Software Engineer at the [Enosis Solutions](https://www.enosisbd.com/). I am a Full-Stack JavaScript developer and love writing clean and maintainable code. Find out more about me & feel free to connect with me here:
[](https://www.linkedin.com/in/ludehsar/)
[](https://rashedul-alam.medium.com/)
[](mailto:mdraanik12@gmail.com)
[](https://www.facebook.com/rashedul.alam.anik.2/)
## ⚡ Technologies


Here, this profile README is divided into four parts. The first section is an overview, the second section is social icon badges, the third section is Technologies badges, and the last one is statistics.
Let’s first change the overview according to our personal preferences.
After changing the bio, let’s change the links and labels of the social icon badges. You can add all the social icons from this repository.
Here is a sample social link badge:
[](https://www.linkedin.com/in/ludehsar/)
Here, we should change the links according to our social URLs. Also, to change the label, you can rename the ludehsar label to your preferred name here.
After that, you can customize the skills badges according to your skills. You can find those badges in this repository.
The final part is the statistics. You can generate your stats by changing the username to your username.
After all those changes, your profile should look something like this:

Step 3: Manage Your Pinned Repositories
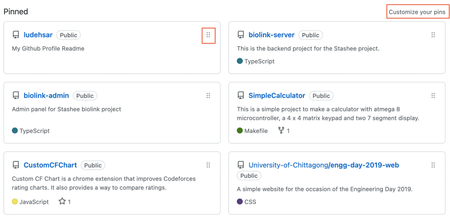
You can add your pinned repository by clicking on the “Customize your pins” link. You can add up to six pinned repositories on your profile homepage.

You can also sort the pinned repositories by using the dragging icon.
Step 4: Organize your repositories
There are various steps when it comes to organizing your repositories.
First of all, your repositories need to have a nice short description in the about section. To add a description in your about section, click on the cog button beside the About section like below:

It’s also nice to include the website URL and the topics associated with this repository.
You can also manage including different components in your repository by checking or unchecking the bottom parts in the about settings.
Next, you can add a nice README to your project. To add a beautiful readme that catches the eye, you can follow my below tutorial: How to Write a Stunning Readme for Your Projects Make your GitHub repositories professionaljavascript.plainenglish.io
You can also add other markdown documentation, such as CONTRIBUTING.md, CODE_OF_CONDUCT.md, SECURITY.md etc. You can generate all those markdown files from the settings of the repositories. These are nice to have as they tell other developers how they can contribute to your project.
Step 5: Contribute to Open Source Project
The final tip to make your GitHub profile look good is contributing to open-source projects daily. It will help grow your green mark in your contribution heat map.
Even if you cannot contribute to the open-source project, you can work on your project. This will increase the green contribution list in your heat map.
Conclusion
That’s pretty much it. If you follow these simple and easy steps, your GitHub profile will look super professional.
Making your GitHub profile look professional will help you create a better impression as a developer. It will boost your chances of getting any programming jobs.
Moreover, it will build your programming profile personality and even can help you reach more clients as a software developer.